Route Preparation
Overview
The Route preparation feature in OsmAnd provides step-by-step navigation guidance for various routing types, including driving, walking, cycling, horse riding, and skiing. Users can customize navigation settings, add destinations, and optimize routes for efficiency.
-
Offline navigation is enabled by default. However, you can also use online routing engines.
-
OsmAnd requires permission to access precise location for accurate navigation. Enable this in device settings if needed.
- Android
- iOS
Set Destinations
Step 1: Download maps.
Before using offline navigation, ensure that the required maps are downloaded. Go to Menu → Maps & Resources → Download Maps to install maps for your region.
Step 2: Configure navigation profiles.
Configure the profiles you intend to use:
-
Set vehicle parameters (important for truck drivers), select the engine type (optional).
-
Configure route line appearance (optional, available for Pro users (Android / iOS)).
-
Configure voice prompts.
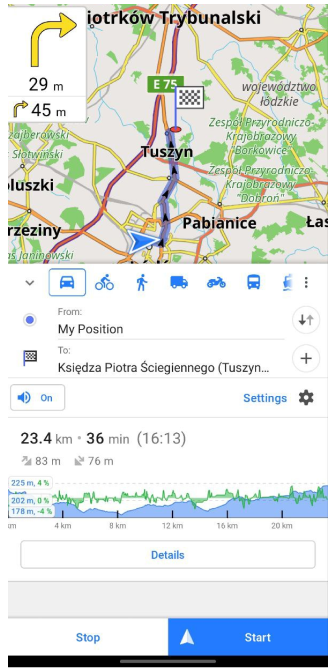
Step 3: Set destinations.
-
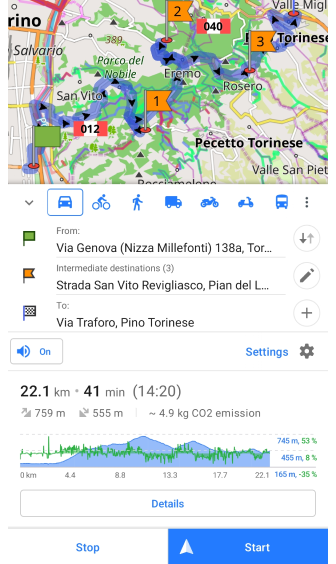
Open the Navigation menu:
- Specify the destination point.
- Wait until the route is calculated. After that, you will be able to obtain additional information about your route in Details section.
- You can switch between different routing types (profiles) to get the best result.
- Add intermediate destinations (optional).
- You can also change the departure point from the current position to the required one.
-
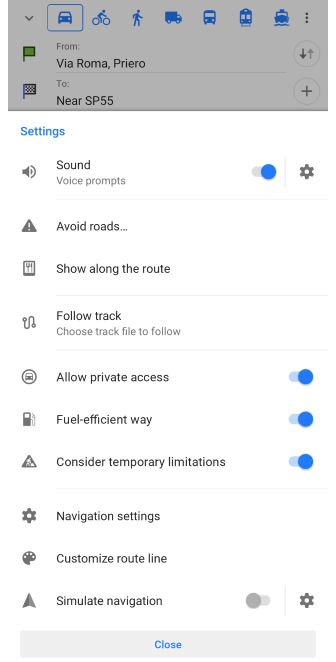
Additional Navigation settings can be used depending on your purposes (you can configure which roads to avoid or prefer, save fuel or choose the fastest route, etc).
-
Start navigation or at first simulate navigation (with this function you can test your route before actually traveling along it). On iOS devices in EU countries, OsmAnd can also be set as the default navigation app in system settings, allowing it to open automatically for navigation requests.
-
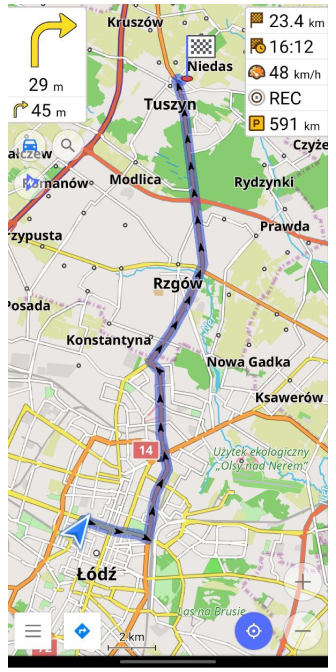
While on the route you can Pause/Resume navigation and Stop it.
Route cannot be build when Online map is selected as map source.
Navigation Menu
There are 3 ways to reach the navigation menu:
- The Navigation button on the map screen.
- Direction to/from in a map context menu.
- Navigation section in the Main Menu (Menu → Navigation).
- Android
- iOS

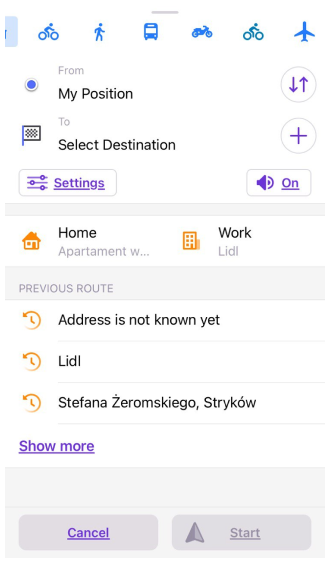
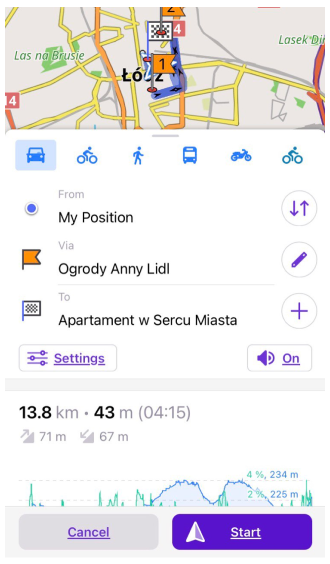
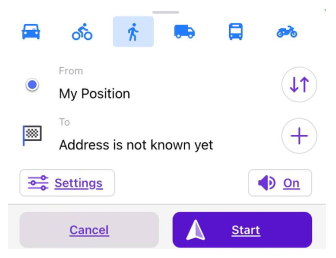
- My Position – Set starting location (default: My Current location).
- Set destination - Use to set your destination point.
- Add + - Insert intermediate points along the route.
- Swap ↓↑ - Reverse the Start and Finish points.
- Sound button - Mute the voice prompts.
- Settings – Adjust route preferences and road restrictions.
Set your destination in the Navigation menu using:
- Special favories points Home / Work.
- Previous route or History.
- The Cancel button leads back to the main screen.
- Start button starts navigation after route calculation has ended.
Select Start Point
- Android
- iOS
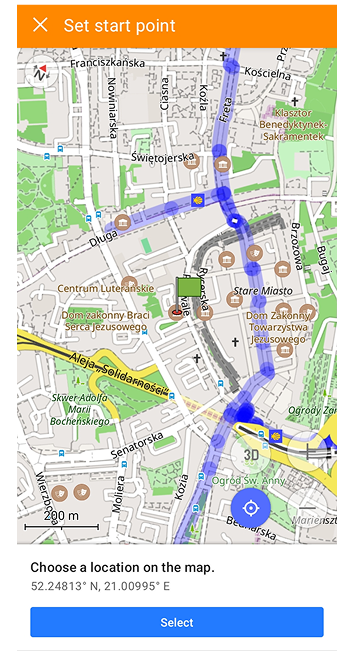
As for the start point, you can choose your current location, the location of a Favorite point, select a point on the map, or use Search. When you select a point on the map, a dialog opens. The map is centered with a marker, the coordinates of the map center are displayed, and you move the map under the marker instead of tapping directly on a spot. To confirm, press the Select button. You can also set a start point in map context menu by selecting the Directions from function.
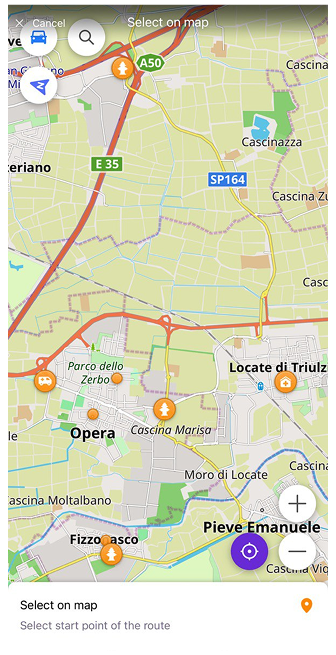
As for the start point, you can choose your current location, the location of a Favorite point, select a point on the map, or use Search. When selecting a point on the map, you can freely move and zoom the map, then tap on the desired location. A flag appears at the chosen spot. You can also set a start point in map context menu by selecting the Directions from function.
Set Target Point
- Android
- iOS

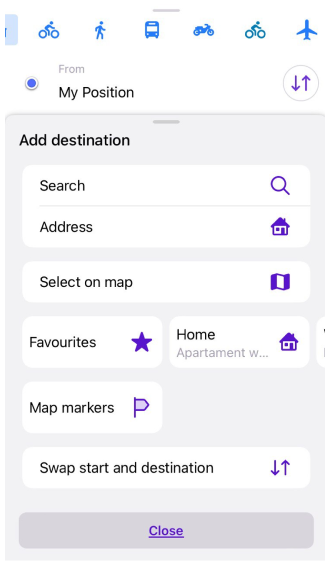
The most important thing to start navigation is to determine your destination. The destination point can be found using a Search function, or simply on a map. You can also set target point in the Navigation menu:
- Search - Opens the search menu.
- Address - Opens address search menu.
- Select on map - Opens a dialog where the map is centered with a marker. Coordinates of the map center are shown, you move the map under the marker, and confirm the choice by pressing Select.
- Favorites - Allows to use Favorite as a destination.
- Markers - Allows to choose one of the Map markers as a destination point.
- Swap Starting point and Destination ↓↑ - Allows to swap Start and Finish points.
The most important thing to start navigation is to determine your destination. The destination point can be found using a Search function, or simply on a map. You can also set target point in the Navigation menu:
- Search - Opens the search menu.
- Address - Opens address search menu.
- Select on map - Allows you to move and zoom the map, then tap on the desired location. A flag appears at the chosen spot and marks the destination.
- Favorites - Allows to use Favorite as a destination.
- Markers - Allows to choose one of the Map markers as a destination point.
- Swap Starting point and Destination ↓↑ - Allows to swap Start and Finish points.
Intermediate Destinations
- Android
- iOS
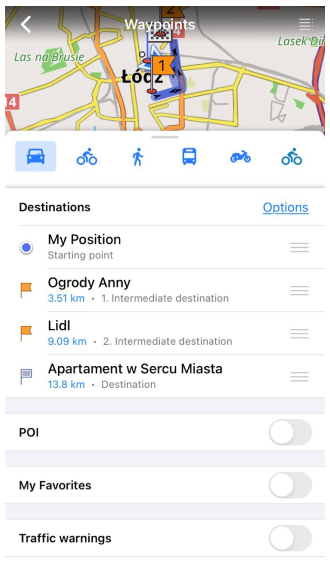
- 🖉 - allows to open the destination points list to make changes.
- ← - moves to Navigation menu screen.
- ✕ - allows to delete destination point from the points list.
- = - allows to change point order in the points list.
- + Add - opens context menu Add intermediate.
- ☰ Clear all - allows to clear all intermediate points.
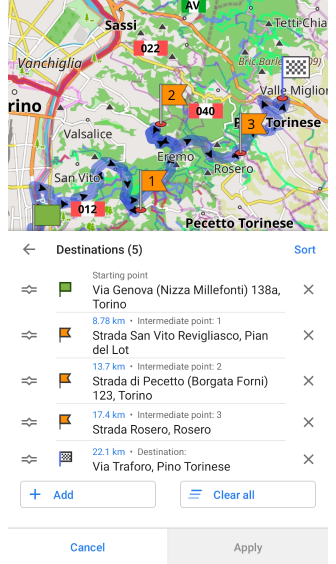
If you choose Sort (Android) or Options (iOS) in the destinations list, you will reach special options to adjust the order of navigation to intermediate points.
- Android
- iOS
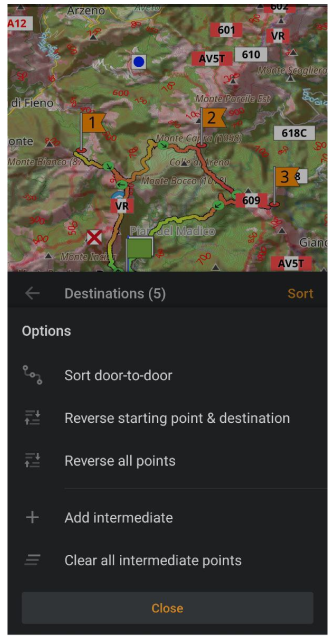
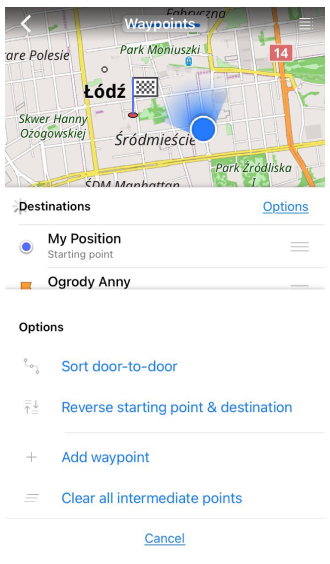
In this menu you can find additional options for managing the destination points:
-
Sort door-to-door - OsmAnd will offer the shortest route between all your destinations, however, the order of the visit can be edited. The starting point and the final destination will not be changed.
-
Reverse starting point & destination - The starting point and final destination will be swapped.
-
Reverse all points (Android only) - All points will be put in the reverse direction.
-
Add intermediate destination / Add waypoint. You can add intermediate destinations from this menu. The process of selecting an intermediate destination on the map is the same as for the start and target points.
-
Clear all intermediate destinations. All the intermediate destinations will be removed from the map.
Use Home or Work Points
- Android
- iOS
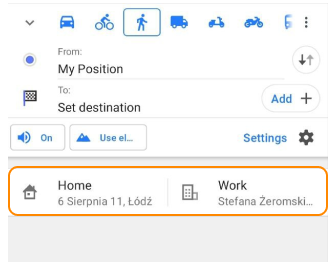
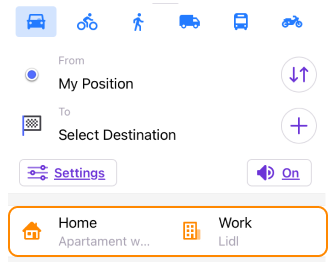
Home and Work tabs (or Special points for Favorites) can be used to quickly set destination points in the navigation menu. If you have not entered the addresses of the Special favorites, these cells will remain empty. If you tap this field, you will be prompted to create these POIs.
History of Previous Routes
- Android
- iOS
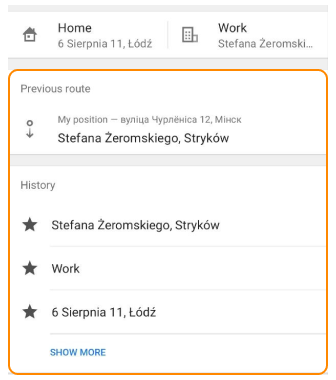
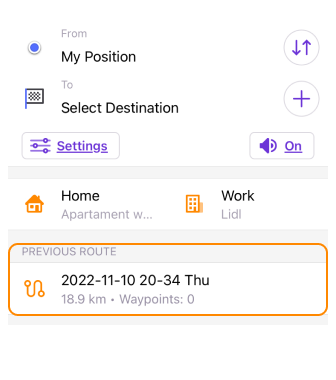
If Navigation History recording is enabled, you can use the previous routes or destinations from the history list for navigation. This option can be useful for quick access to frequently used routes. Items in the history list are sorted by most recent use, starting with the newest.
- When logging of History data is disabled, you will not be prompted to use previous routes for navigation.
- You can delete some or all history records about your previous routes. This can be done on the Navigation history tab of the History option (Menu → Settings → OsmAnd settings → History).
Start / Stop Navigation
- Android
- iOS
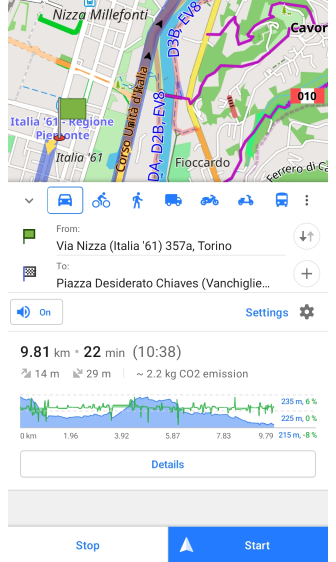
Once start and end points are selected, the app will create a route between them using an active profile. The App profile and widgets set will only switch once you tap the Start button of navigation.
- Tap Start to begin navigation.
- Pause navigation when taking a break. (Android only)
- Stop navigation by selecting Stop (Android) or Cansel (iOS).
Additional information about the created route, such as altitude, turn-by-turn instructions, analyze tool, and others, can be found in the Details section.
Route Recalculation
The route can be recalculated automatically in case of deviation from it. You can change the parameters of the recalculation in the Navigation settings. You can also disable notification about route recalculation in the settings of Voice prompts.
Pause / Resume Navigation
This feature is currently not available for the iOS version of the OsmAnd app.
If you want to stop for a break and deviate from the route for a short time, you can use the Pause/Resume navigation function to pause voice prompts and stop recalculating the route.
This option is available in the Android version of the app in Notification list or from the Quick actions menu.
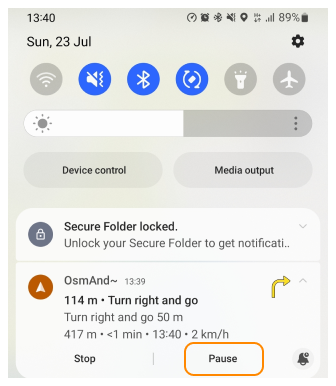
To resume the navigation:
- Use the message from OsmAnd in the notification bar.
- Use Quick actions menu or dialog, that appears when you tap the Navigation button (see screenshot).
- Android
- iOS
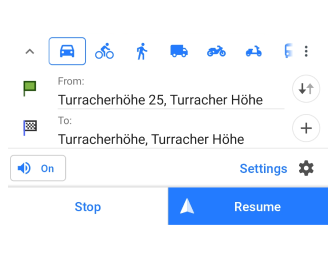
When you tap the Navigation button while on your route, navigation doesn't stop, and voice prompts continue to be voiced, although proposed options Resume or Start may be confusing.
Power-Saving Tips
Navigation uses GPS and background processing, which can drain the battery. To optimize power usage:
- Turn off the screen while relying on voice prompts.
- Enable Screen control (Android only) in Menu → Configure profile → General settings → Turn screen on.
Settings
Navigation Settings
To access the navigation settings, follow one of the steps below:
- Menu → Settings → Profiles → Driving → Navigation settings.
- Navigation button → Settings → Navigation settings.
- Menu → Navigation → Settings → Navigation settings.
There are no navigation settings in Browse map profile.
- Android
- iOS
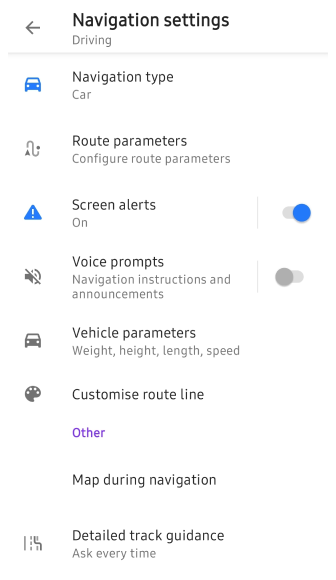
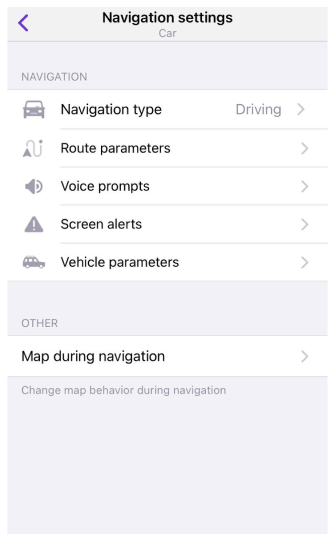
-
Navigation type determines how routes are calculated. For example, your bicycle profile has a Cycling navigation type, which sets the routing rules. You can import these roules (as routing.xml file) in OsmAnd. More about routing you can read on our GitHub page.
-
Route parameters controls which parameters will be used during routing (this is the process of selecting a route for navigation).
Please read about route parameters for the corresponding navigation type.
How to configure routing type and route parameters you can read in the Navigation settings article or in articles about specific types of routing in the Route Parameters section.
Simulated Navigation
The Simulated navigation tool allows you to preview a route before traveling. This helps with planning, familiarization, and testing OsmAnd's navigation system.
Start / Stop Simulation
- Android
- iOS
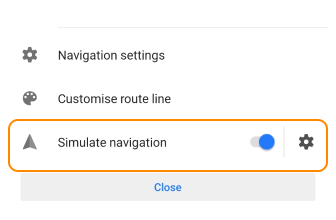
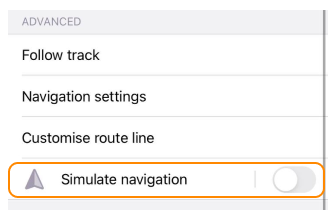
When a navigation route is built, you can start simulating navigation using the Simulate navigation option.
- In the Navigation menu go to Settings → Simulate navigation.
- Toggle the switch to enable the option.
- Tap the Start navigation button to start the simulation.
- To Stop the navigation simulation, tap Stop (Android), or Cancel (iOS).
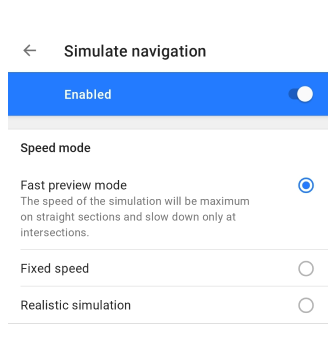
Speed Mode
- Android
- iOS
Go to: Navigation → Settings → Simulate navigation → ⚙
Go to: Navigation → Settings → Simulate navigation → ⚙
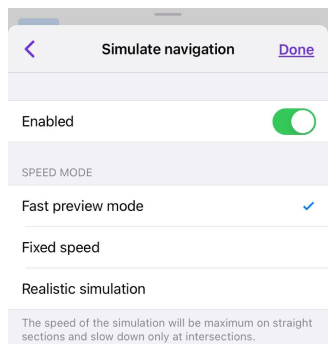
-
Fast preview mode - Speeds up simulation on straight paths, slowing down at intersections.
-
Fixed speed - Runs at a fixed speed.
-
Realistic simulation:
- On straight sections of the road, the speed will be close to the maximum allowable speed.
- At intersections, the simulator will reduce speed.
- Additional penalties will be applied at traffic lights, stop signs, and other similar obstacles.
Maps Missing or Not Synchronized
To build a route all necessary maps need to be downloaded and have the same release date. Please note, that in some situations missing maps message could be hidden in the route preparation menu. If you pull the navigation menu up, you will see possible reasons why your route couldn't be calculated.
- Android
- iOS
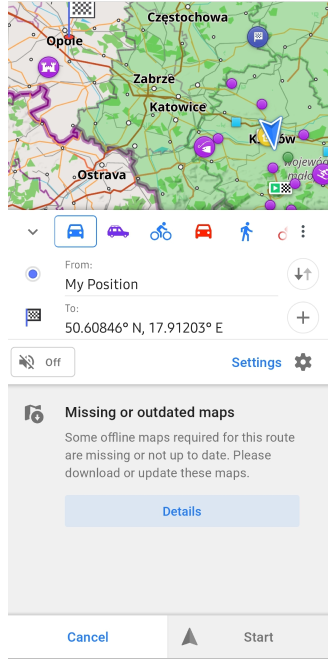
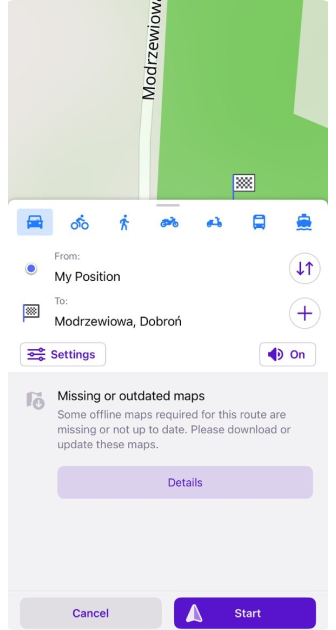
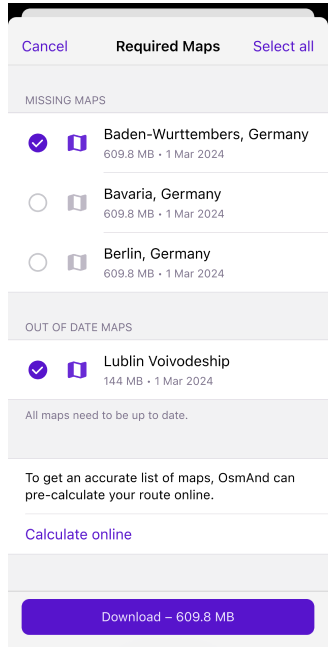
Required Maps
In the required maps dialog you will see suggestions of maps to be downloaded or updated. The list of used maps might be not precise as it calculates a very basic route, to get the precise list of maps you can click Calculate online. If you select Use downloaded maps then routing calculation will try to use already downloaded maps and skip the warning message.
- Android
- iOS

Common Issues and Solutions
- The possible causes of slow route calculation.
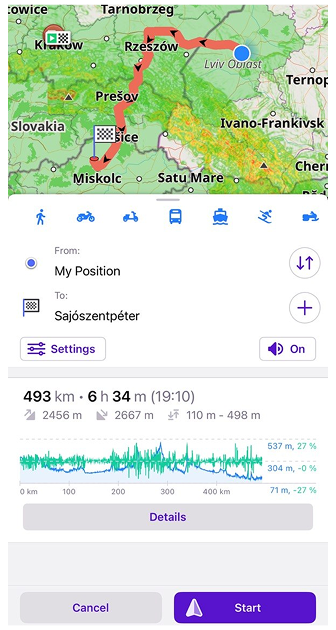
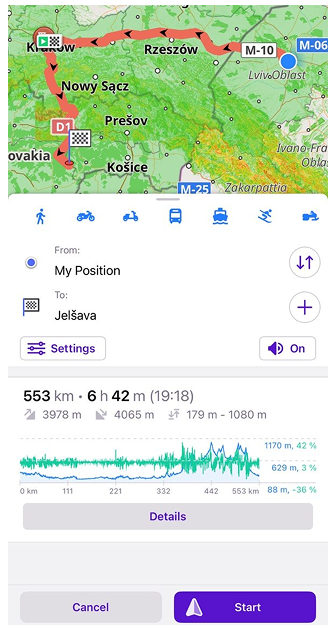
- What to do if the route length exceeds 250 kilometers.
- What to do if the suggested route seems incorrect.
- How to solve the situation when navigation is not possible due to the lack of necessary maps.
For more troubleshooting steps, see navigation issues.